How to configure Express planner settings
Objective
This guide helps you configure or revise Express planner settings to improve forecasting accuracy for your property.
Express planner’s forecasting accuracy depends on proper configuration of three key areas: General setup, Ancillary revenue, and Labor hours. These settings control what data source Express planner uses and how far in advance it can generate forecasts.
Requirements
- User access to run Express planner for your property
- Access to the Budget & forecast module
- Forecast periods must be unlocked for the months you plan
Estimated time to complete
10–15 minutes
Steps
Step 1. Navigate to Express planner
-
- Go to your Budget & Forecast page.
- Look for the Run Express Planner option in your tools. It’s irrelevant which department page you are on.
- Click Run Express Planner to open the planning interface.
Step 2. Configure General set-up
-
- From the Express planner main page, click View and edit settings in the navigation.
- Select General set-up of the three available options
1. Configure abnormal period handling
A. In section 1. Handling abnormal periods, set thresholds for data quality:
-
-
-
-
- Room division: Set the minimum monthly room revenue value. If actual revenue falls below this threshold, Express planner will use source average values instead.
- Other divisions: Set the minimum percentage threshold for ancillary revenue calculations. If the monthly ancillary revenue % is below this, the yearly average will be used instead.
-
-
-
Enter 0 in both to accept all monthly values as valid, including unusually low ones. Express planner will treat them as normal and include them in the forecast.
Real-life example: If you set room revenue threshold to $50,000, Express planner will ignore any months with room revenue below this amount and use chosen source averages instead. This prevents unusual events (like renovations or closures) from skewing your forecasts.
2. Set planning start restrictions
A. In section 2. Set Express planner start month, specify:
-
-
-
-
- Months: Fill in with the number of months from next month which Express planner should not overwrite the existing forecast values.
- Start date: This will update automatically to show when Express planner can begin making changes.
-
-
-
Real-life example: If you set the exclusion period to 3 months and today is April 15th, Express planner will count three full months starting from the next month — May, June, and July. This means Express planner will only start updating the forecast from August.
3. Configure timing and data sources
A. In section 3. Specify the total length of planning period and data source for auto-planning:, complete the planning table:
1. Set total Express planner duration:
-
-
-
-
-
-
- Set the total number of months to forecast (up to 24 months)
- This determines the overall scope of Express planner forecasts.
-
-
-
-
-
2. Room revenue part 1:
-
-
-
-
-
-
- Always uses “Live room forecast (values)” – your current forecast data.
-
-
-
-
-
3. Room revenue part 2:
-
-
-
-
-
-
- Use Room revenue part 2 when your forecast extends beyond the period covered by your Live room forecast (used for Room revenue part 1) or if the data is less reliable.
- Set the number of months at the end of the forecast that you want to use the alternative source to determine room nights. (selection for # months for Room revenue part 1 will automatically update based on your choice)
- Select source: “Last available forecast (prior year)” or “Actuals from the past 5 years.”
-
-
-
-
-
4. Ancillary revenue:
-
-
-
-
-
-
- Choose data source: “Last submitted forecast,” “Last available actuals,” or ” Actuals from the past 5 years.”
- Best practice for consistency with existing planning: Start with “Last submitted forecast”
-
-
-
-
-
5. Labor hours:
-
-
-
-
-
-
- Choose the productivity data source: “Last submitted forecast,” “Last available actuals,” or ” Actuals from the past 5 years.”
- Best practice for consistency with existing planning: Using “Last submitted forecast” maintains consistency with previous staffing plans.
-
-
-
-
-
6. Save
Step 3. Configure Ancillary revenue settings
1. From the View and edit settings menu, click Ancillary revenue.
1. Review the data source
1. Review the data source displayed beside 1. Baseline chosen for ancillary revenue (configured in General set-up page).
2. Set revenue growth targets
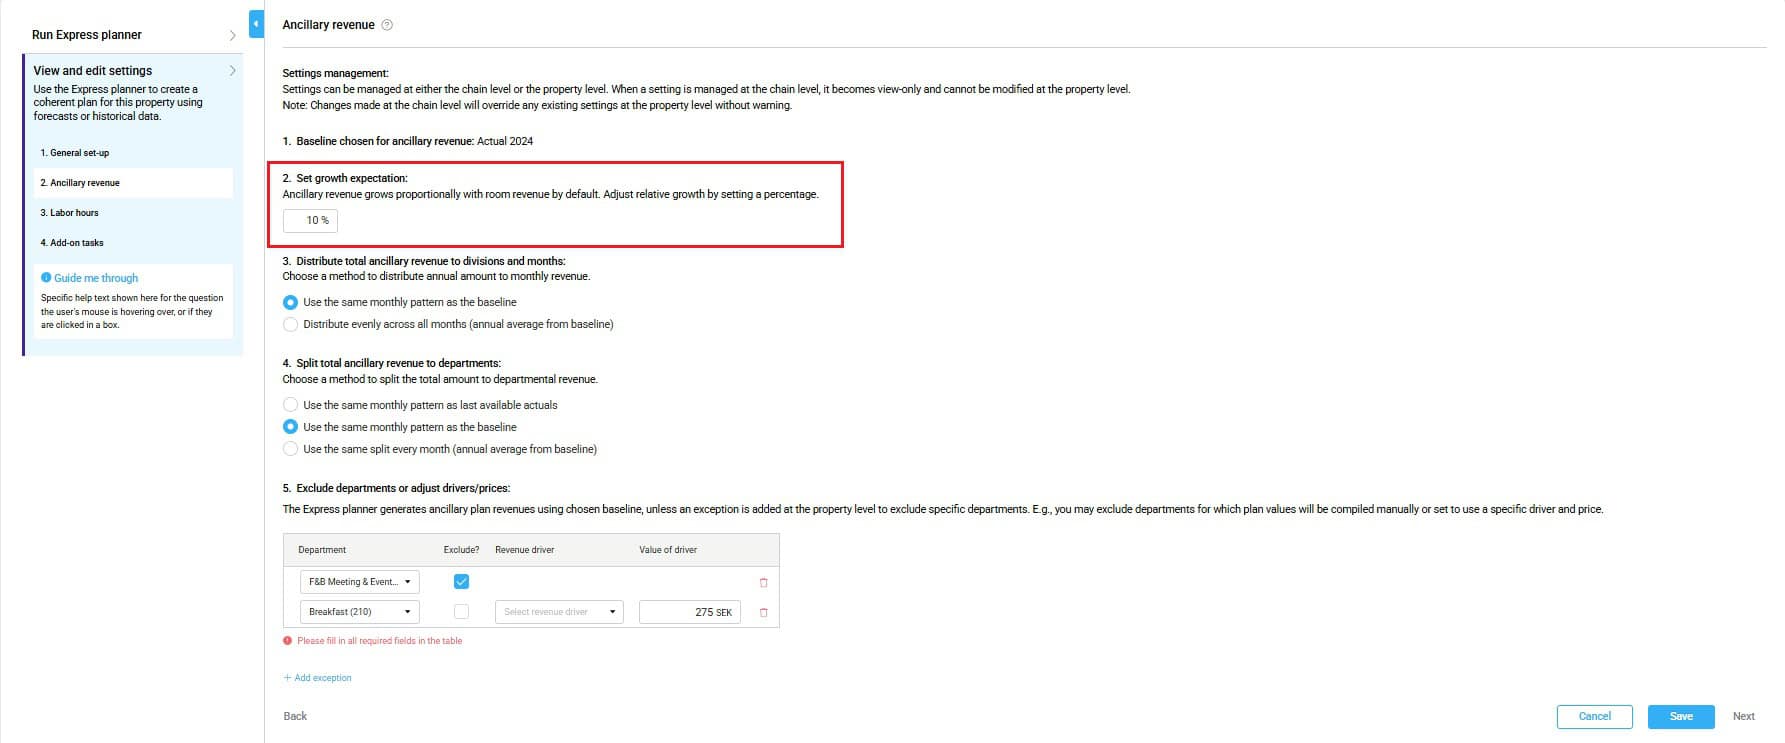
A. In section 2. Set growth expectations, enter your monthly growth percentage:
-
-
-
-
- Use two decimal places for precision (e.g., 3.50% for 3.5% growth).
- Enter 0% to maintain the current revenue ratio compared to room revenue.
-
-
-
3. Configure monthly distribution method
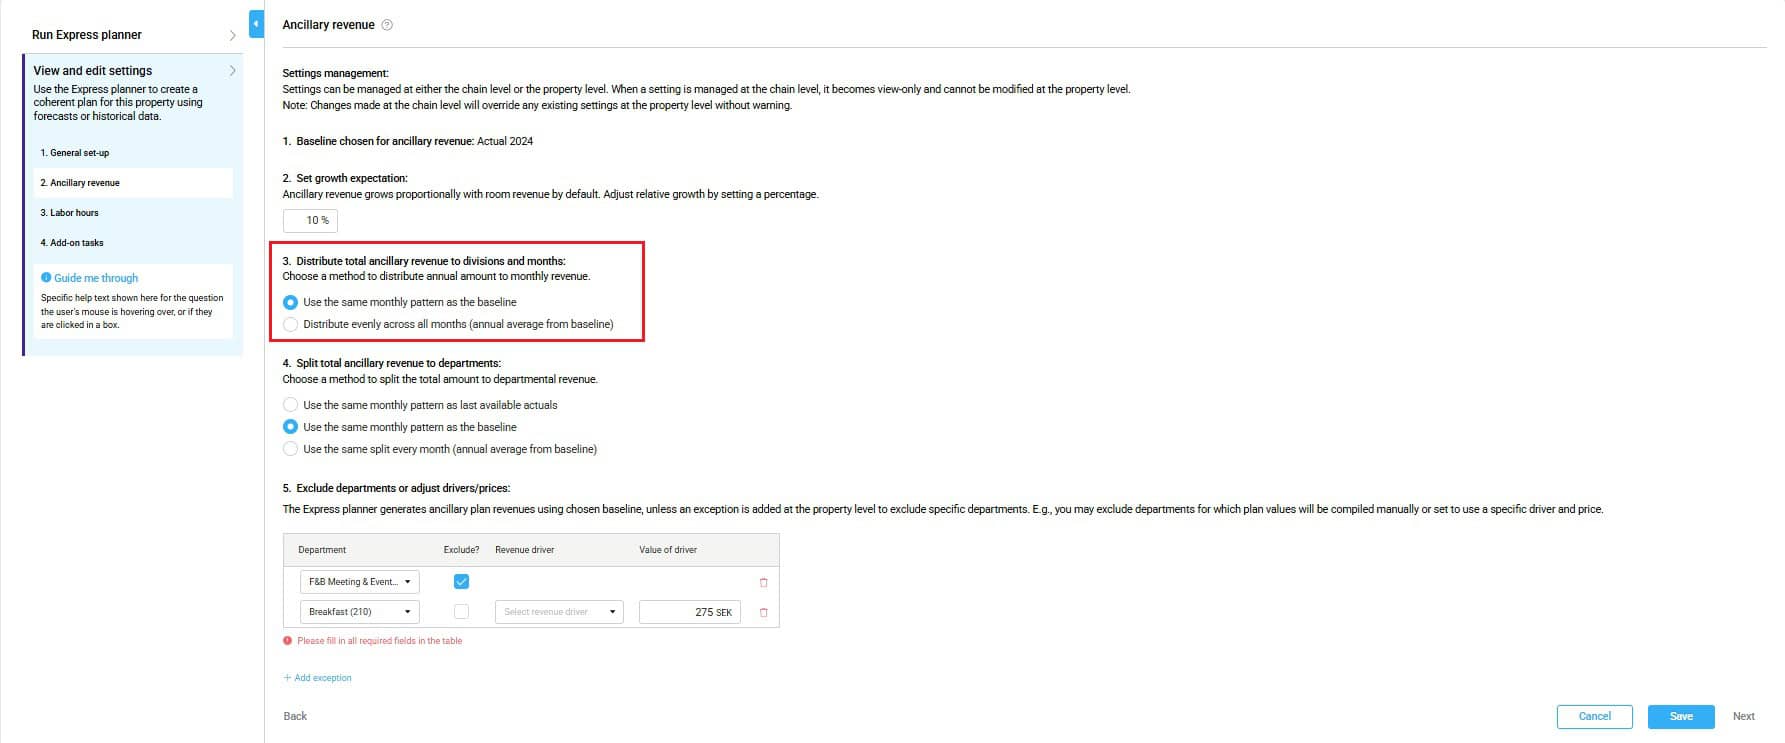
A. In section 3. Distribute total ancillary revenue to divisions and months, select your approach:
-
-
-
-
- “Use same monthly pattern from baseline” (Recommended for most properties)
- Applies seasonal patterns from your selected data source.
- Best suited for businesses with consistent seasonal trends.
- “Distribute evenly across all months”
- Distributes revenue evenly across all months.
- Recommended for businesses with little or no seasonal variation.
- Only available if Actual <previous year> is chosen as a baseline for Ancillary revenue
- “Use same monthly pattern from baseline” (Recommended for most properties)
-
-
-
4. Set department-level distribution
A. In section 4. Split total ancillary revenue to departments, choose:
-
-
-
-
- “Use the same monthly pattern as baseline”(Recommended)
- Maintains each department’s share of total ancillary revenue.
- Preserves seasonal variations by department.
- Alternative options available when using forecast baselines
- “Use the same monthly pattern as baseline”(Recommended)
-
-
-
5. Exclude departments or adjust drivers/prices: (optional)
A. Click + Add exception to customize specific departments
B. For each department, add:
-
-
-
-
-
- Department:Select from active revenue-generating departments
- Exclude:Check to exclude department from Express planner calculations
- Revenue driver:Choose what drives revenue (Guest Nights, Room Nights, Room revenue, Total revenue).
- Value of driver: Input the revenue per driver unit for the department.
Eg: Room Nights: $150 per room night, Room Revenue: $0.10 per $1 room revenue, etc.
-
-
-
-
6. Save ancillary revenue settings
-
-
-
- Review all configured settings for accuracy
- Click Save to apply changes
-
-
Step 4. Configure Labor hours settings
1. From the View and edit settings menu, click Labor hours.
1. Review the data source
1. Review the data source displayed beside 1. Baseline productivity (configured in General set-up page).
2. Choose productivity calculation method
A. In section 2. Choose method to determine productivity, select your approach:
-
-
-
-
- “Use productivity from same month in baseline”(Recommended for most properties)
-
-
-
-
-
-
-
-
- Accounts for seasonal variations in productivity
-
-
-
-
-
-
-
-
- “Use annual average for all months from baseline”
-
-
-
-
-
-
-
-
- Applies the same productivity rate across all months
- Suitable for departments with consistent efficiency throughout the year
-
-
-
-
-
-
-
-
- “Use same month productivity from last available actuals”
-
-
-
-
-
-
-
-
- Uses actual productivity data from the most recent 12 months
- Ideal for capturing current operational efficiency improvements
-
-
-
-
3. Set productivity improvements
A. In section 3. Adjust historical productivity, enter percentage adjustment:
-
-
-
-
- Use 2 decimal places for precision.
- Positive values: Reflect efficiency improvements (fewer hours needed per unit of business)
- Negative values: Reflect increased service needs or temporary inefficiencies (e.g., training periods)
-
-
-
4. Exclude departments or specify departments with fixed hours (optional)
-
-
-
- Click + Add exception to customize specific departments.
- For each department:
-
- Department:Select from labor cockpit departments
- Cost driver:View the primary business driver
- Exclude:Check this box to exclude from Express planner calculations
- Fixed hours:Check to use predetermined daily hours instead of productivity-based calculations
- Hours per day:Set or adjust the average daily hours (defaults to the last 12-month average). The Average column shows the last 12-month average for reference.
-
-
-
5. Save labor hours settings
-
-
-
- Verify that all department configurations are appropriate for your operation.
- Click Save to apply labor hours settings.
- Use Save and return to complete configuration and return to the main dashboard.
-
-
Step 5: Configure add-on tasks to run with express planner
Under add-on tasks you can select the additional tasks you would like to run with express planner. These tasks can also be set at the chain level such that they automatically are selected at the property level.

-
-
- Update ancillary live forecast for all profit centres: EP will copy the new ancillary forecasts to live forecast when run.
- Split and update staff hours (in-house and outsourced): EP will split forecasted hours into in-house and outsourced in staff module in P&L based on historical proportions.
- Replace WIP manual entries with reference data version: EP will copy any manually entered forecast value in P&L from the reference period to the new forecast period in P&L.
- Update hotel with head office costs (HQ refresh): EP will run HQ refresh.
-
Expected outcome
Once you’ve configured and saved your settings, Express planner will use your chosen sources, exclusions, and targets to generate accurate forecasts for room revenue, ancillary revenue, and labor hours. These forecasts will reflect your operational strategy and be visible in the Budget & forecast and Profit & loss modules after running Express planner.
Troubleshooting
- My settings didn’t save:
- Make sure all required fields are completed and that you clicked Save before exiting each section.
- The excluded department still appears in the plan:
- Double-check that you selected Exclude for the correct department under exceptions and that the change was saved.
- Room revenue part 2 didn’t apply:
- Ensure you defined how many months Room revenue part 1 should cover. Room revenue part 2 will only apply after that point.
Related features and modules
- Budget and forecast
- P&L Planning
- Staffing module
- Live forecast
- Cockpit
FAQ
Q: Can I change the baseline data later?
A: Yes. You can return to the Express planner settings and update your selections at any time before running the plan.
Q: What happens if I skip configuring a section?
A: Express planner will use the last saved settings or defaults. It’s best to review each section before running the plan.
Q: How do I handle departments with fixed staffing?
A: In the Labor hours configuration, add an exception and select Fixed hours, then enter the average daily hours.


