User administration overview
What is User administration?
This module is where you manage user access. Add, delete or edit a user’s access rights in a specific property or properties. The module is accessed via the main menu in PMI, under the Administration column. Administrators and users with user administrator access role will have access to this page.
User list
User information
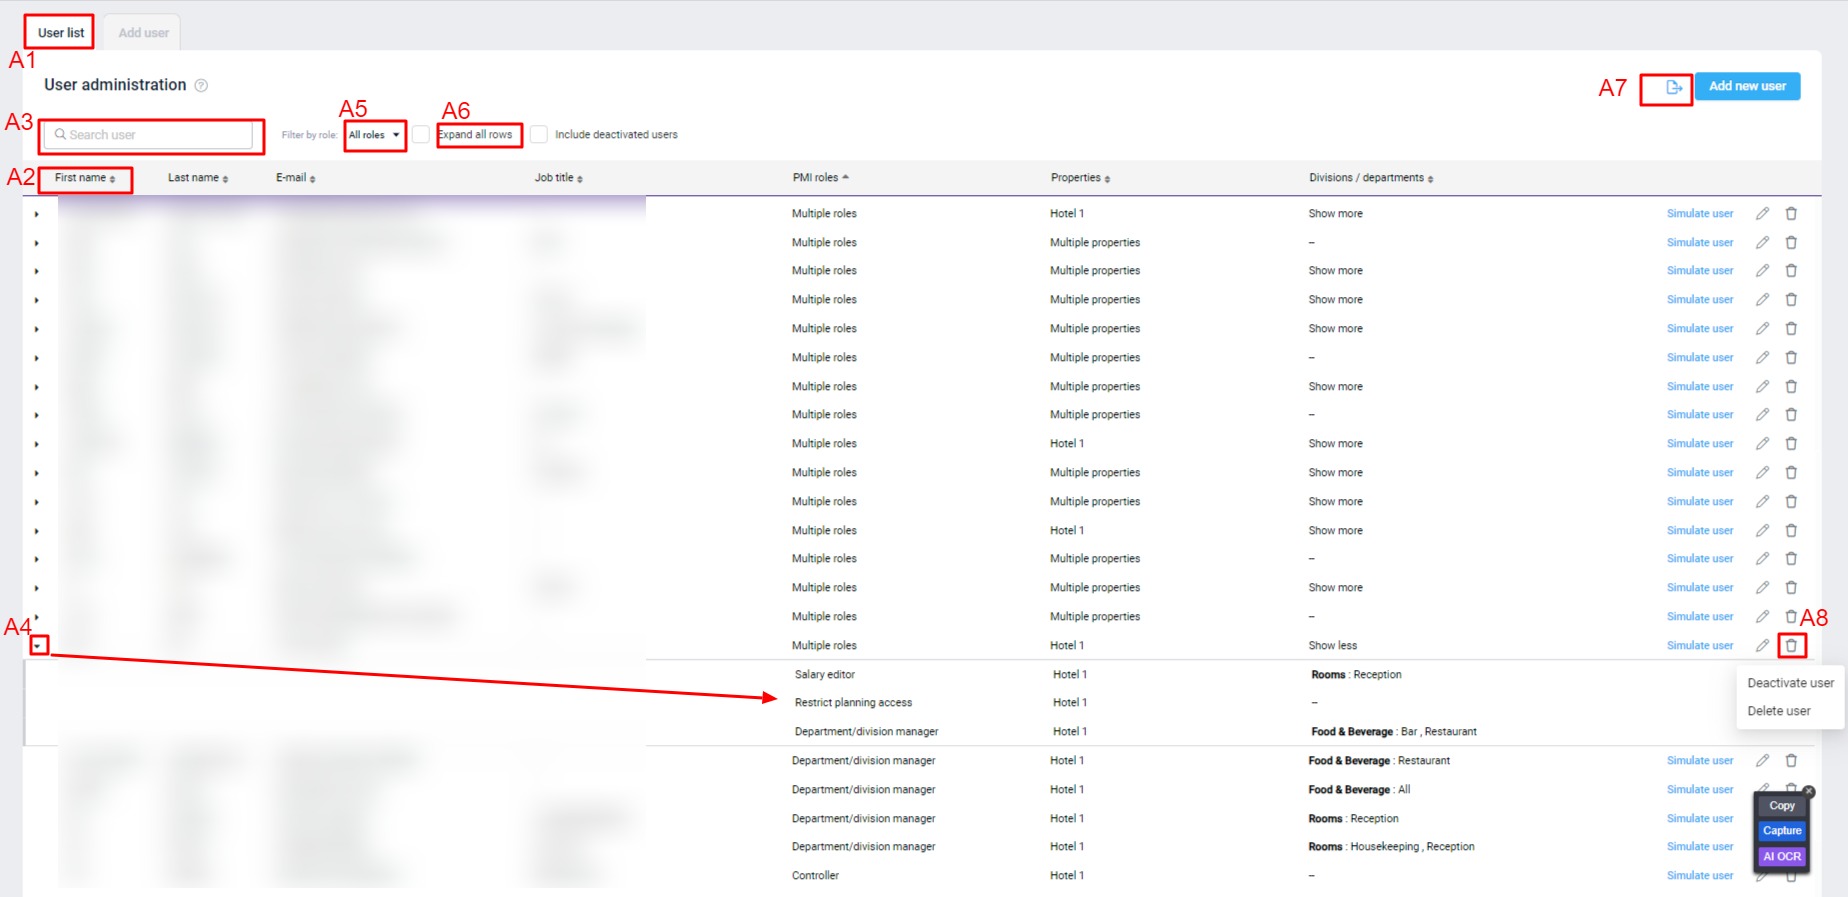
The User list (A1) is the default view when you enter the page. Here, you can view and sort users by First name, Last name, Email, Job title, PMI role, Property and Division (A2).
You can also search for a user by name or email address (A3). If you are on property level, it will search through all uses with access to that property. If you are on chain level, it will search through all users within the chain.
Click on the expand arrow by a user (A4),to see all their roles in PMI. There is an option to filter by role (A5). Select a role from the dropdown to view only the users assigned that role. If on chain level, this will display all users with selected role across all properties in chain.
You can also select Expand all rows, to see all roles for all users (A6).
The information that you see on the page can be exported as an Excel spreadsheet (A7).
IIf there is an information icon next to a user you can hover over it to see the relevant information. This could be a notification that the user’s account has been deactivated or that the user was created but it will not be active until a future date.
Delete user
Click on the delete icon (A8) to deactivate or delete a user from the selected property. A deactivated user will not have access to PMI but their account can be reactivated at any time via the pen icon. If you delete a user, their account will be permanently deleted. It cannot be recovered.
Add a new user
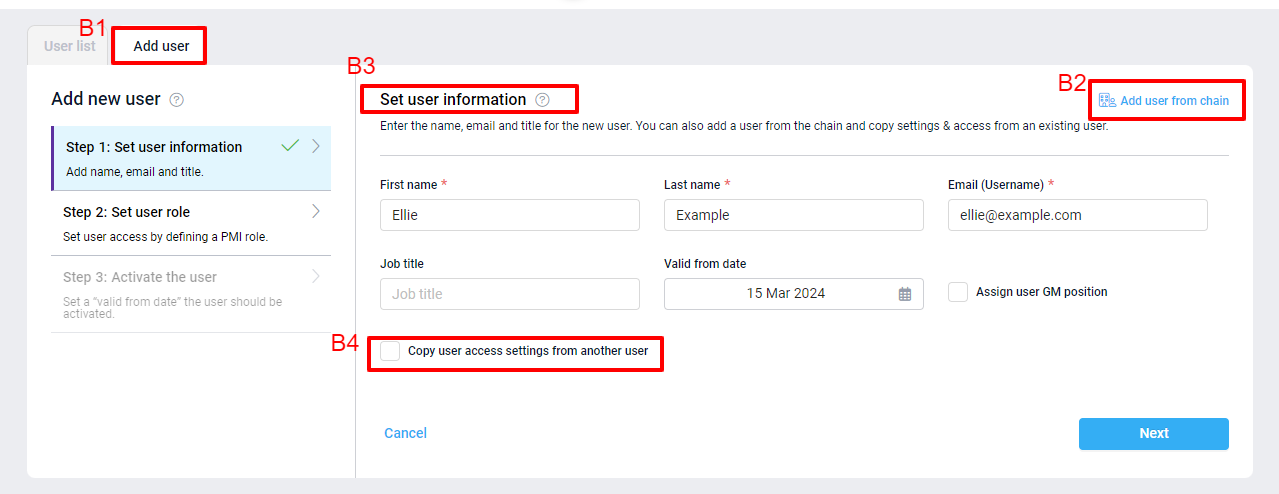
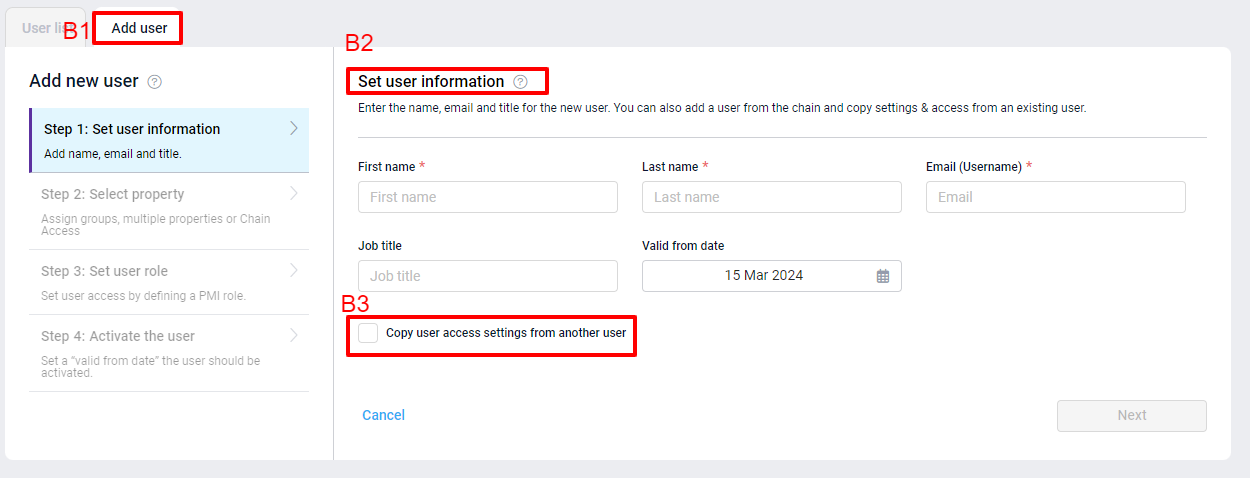
To add a new user, click on the Add user tab (B1). Users can be added to a single property, or to multiple properties:
Adding a user with single property access
Step 1: Add user information
If the new user already has access to PMI at another property, you can select Add user from chain (B2). Note, the user access selected here will apply only to this property, and not to any other properties the user may already have access to.
Fill in the user details and start date (B3). Fields with a red star are mandatory.
The valid from date is set to today’s date by default. You can change this to a future date if needed.
If the new user will have the same access as another user at the property or chain, click Copy user access setting from another user (B4), then select the user who you want to copy. This will eliminate the need to complete steps 2 and 3.
Step 2: Set user role
Select a PMI role for the user. This will determine the user’s access rights within PMI. For details on the access rights for each role, see this article.
Each user can be assigned only 1 main role. Dependent on the role selected, there are additional roles that can be added on.
If the role selected is department specific, you have the option to select the department(s) that the role should be applied to. You can select departments or full divisions as required. Once you are happy with your selection, select Apply.
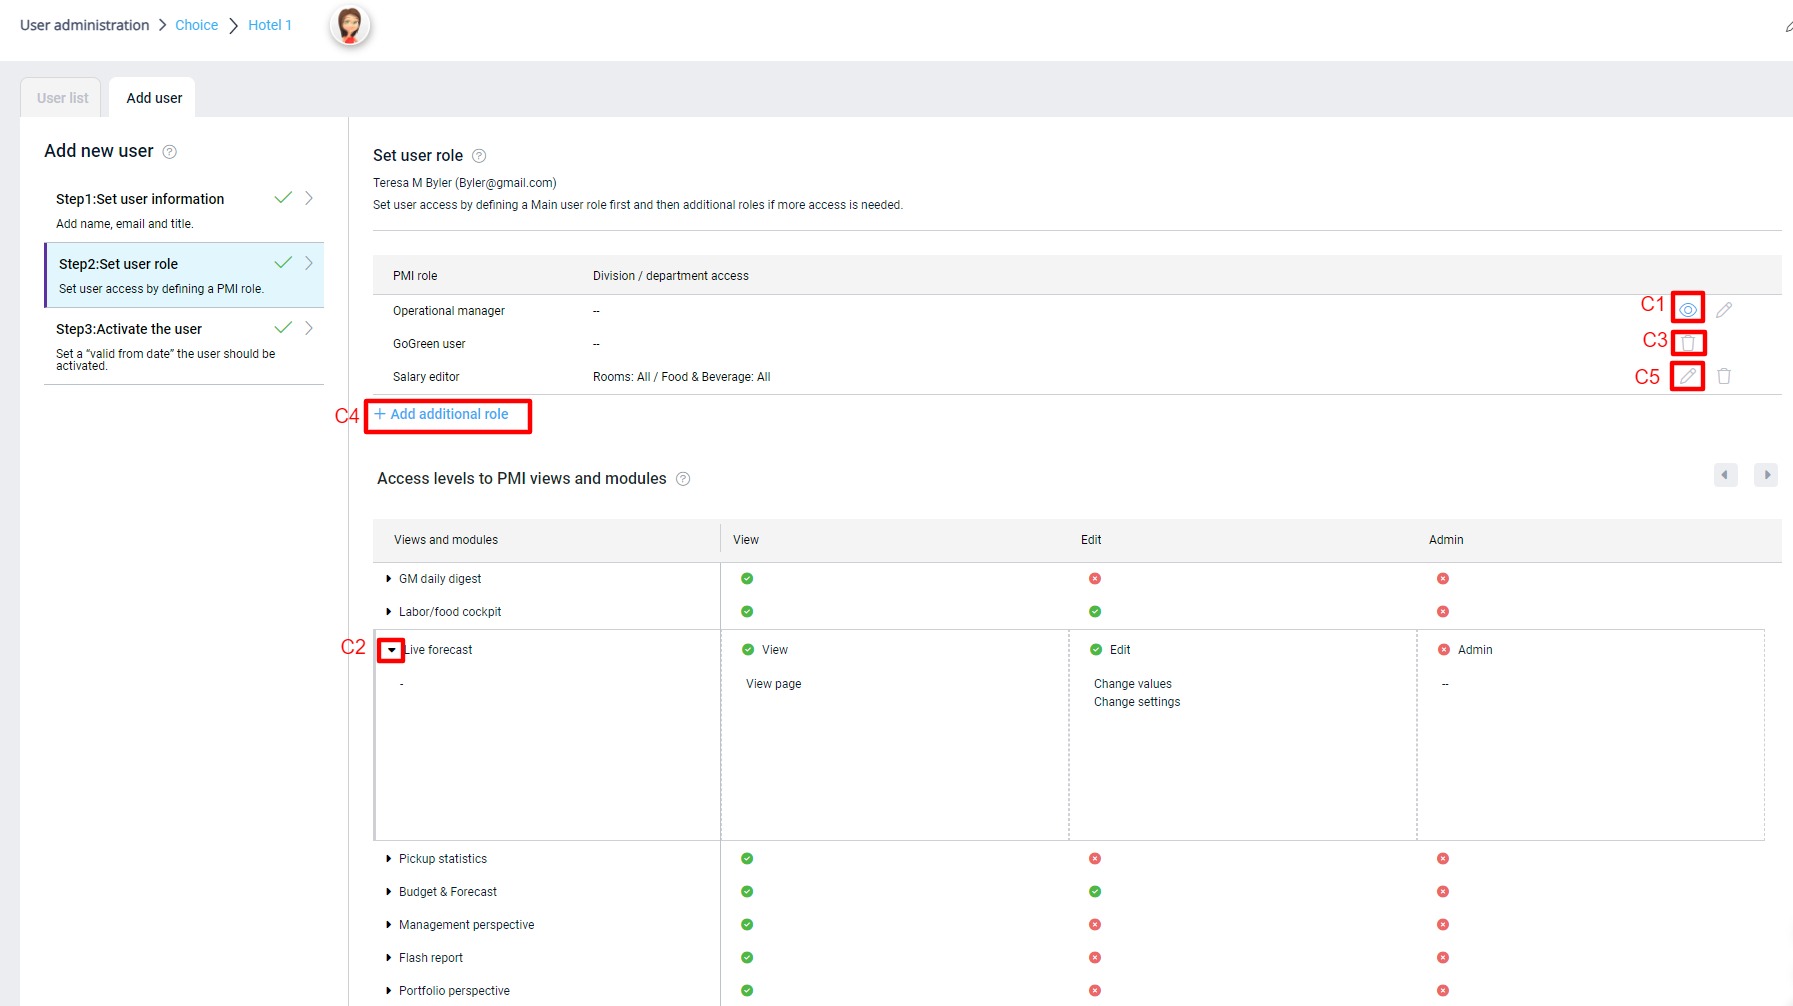
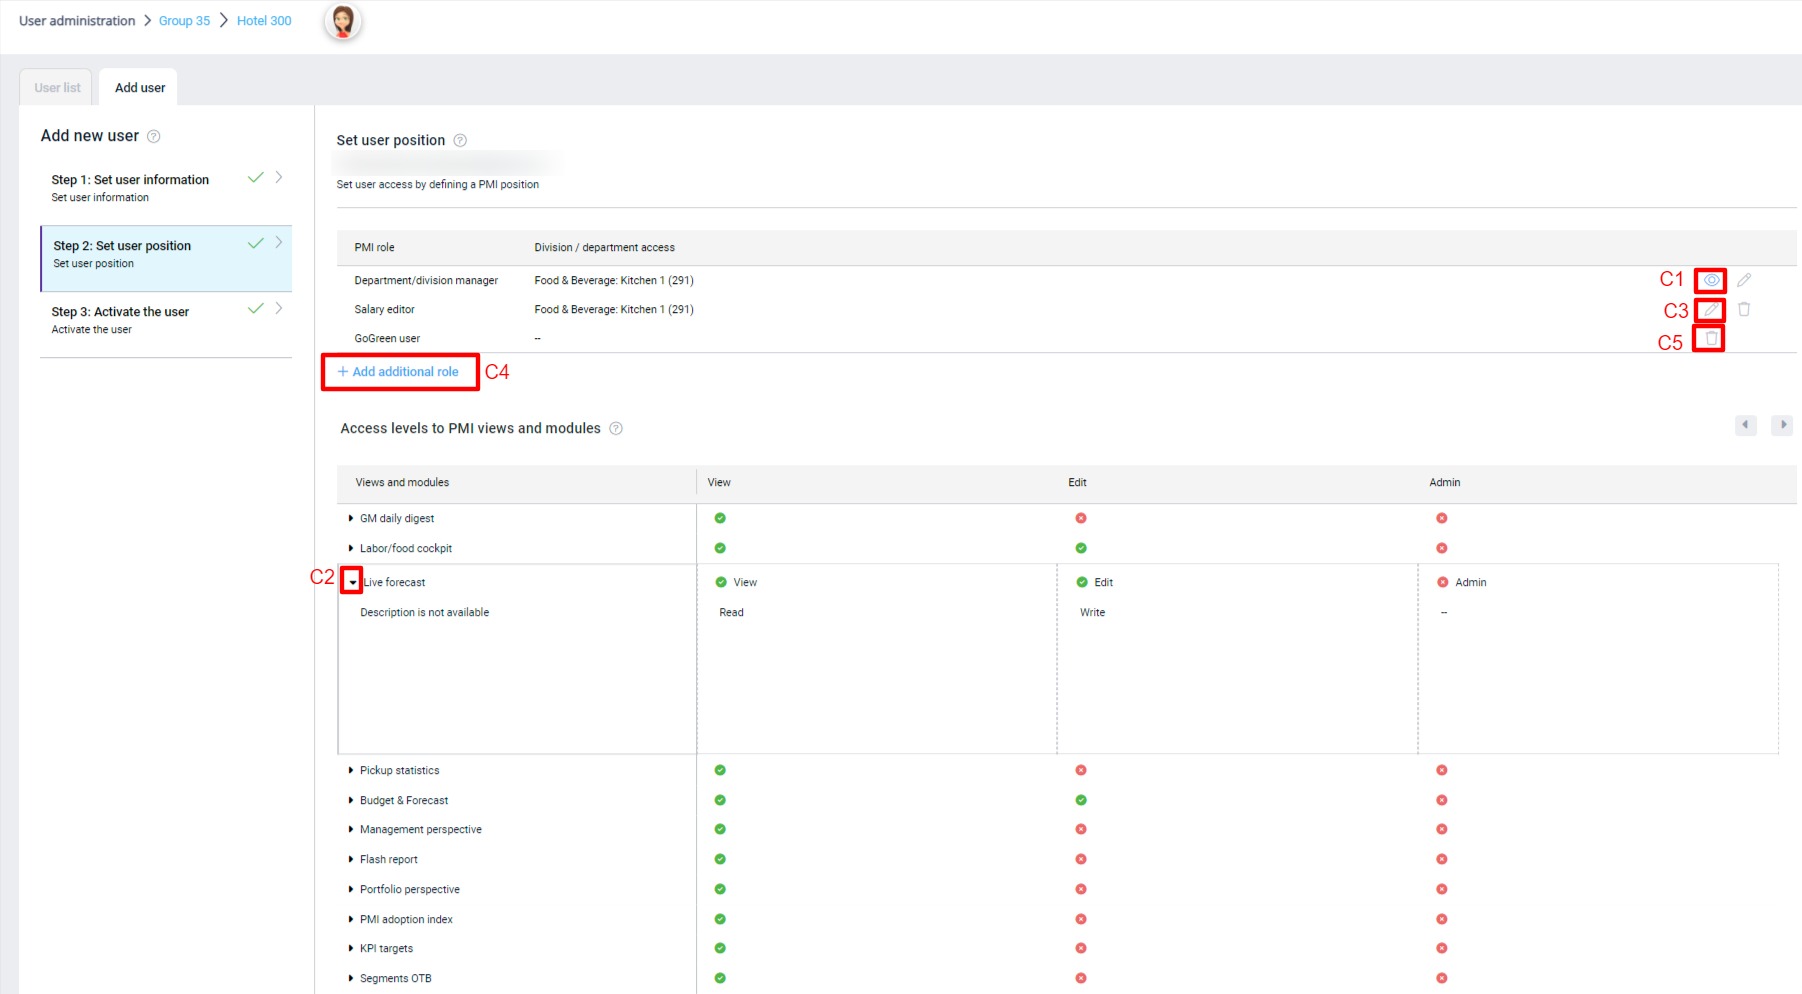
The screen will display a confirmation of the new user details with the chosen roles. Click on the eye icon to the right of a role to view a breakdown of the access that the new user will have to each module in PMI (C1).
Click on the arrow beside the module (C2) to expand for more details on the view or edit access in that module.
In general, ‘View’ access allows users to see the module, but they cannot make changes. A user with ‘Edit’ access can make changes but has restricted access to settings. An ‘Admin’ user has full access to make edits and adjust settings in the module.
To edit the selected access, click the pencil icon to the right of the row (C3) to edit or change the role selected. You can also add (C4) and remove add-on roles (C5).
IIf you change the main user role, some additional roles may disappear. This is because the access rights are already included in the main role. Once everything looks good, click Next.
Step 3: Save and activate the user
Review and confirm that all the details, including the recipient’s email address, are correct
You can select to send email with activation link to a user, and can be added as bcc to verify that the user receives the email. If you are making changes to an existing users access, you can deselect the send email option – they are already activated in PMI so an email is not needed.
An email will then be sent to the new user with a link to create a new password and log in to PMI. This link is only valid for 48 hours. The email can be re-sent to the user via the edit a user function if needed.
If you have created a user with a future valid from date, the email should arrive on the valid from date. If you selected a future valid from date, the email will be sent at the future date. The user will show in the user list with a warning message notifying they are not yet an active user.
Adding a user with multi-property access
A user can be granted access to multiple properties, groups, or an entire chain. HQ Administrator rights or HQ Controller with user admin rights are needed in order to add users at this level.
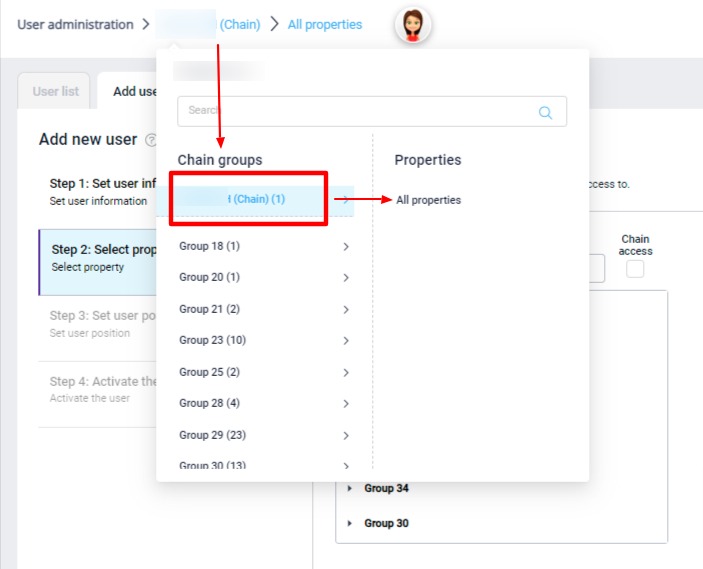
When you enter the user administration menu, go to the navigation menu, and select chain > all properties. Then select the Add user tab.
Step 1: Set user information
This is the same process as adding a user with single property access.
Fill in the user details and start date (B2). Fields with a red star are mandatory.
If the new user will have the same access as another user at the property or chain, click Copy user access setting from another user (B3), then select the user to copy. This will eliminate the need to complete steps 2 and 3.
If the new user already has access to PMI at another property, you will need to search for them in the user list and edit their user access to give them additional rights. (See section Edit user).
Step 2: Select property
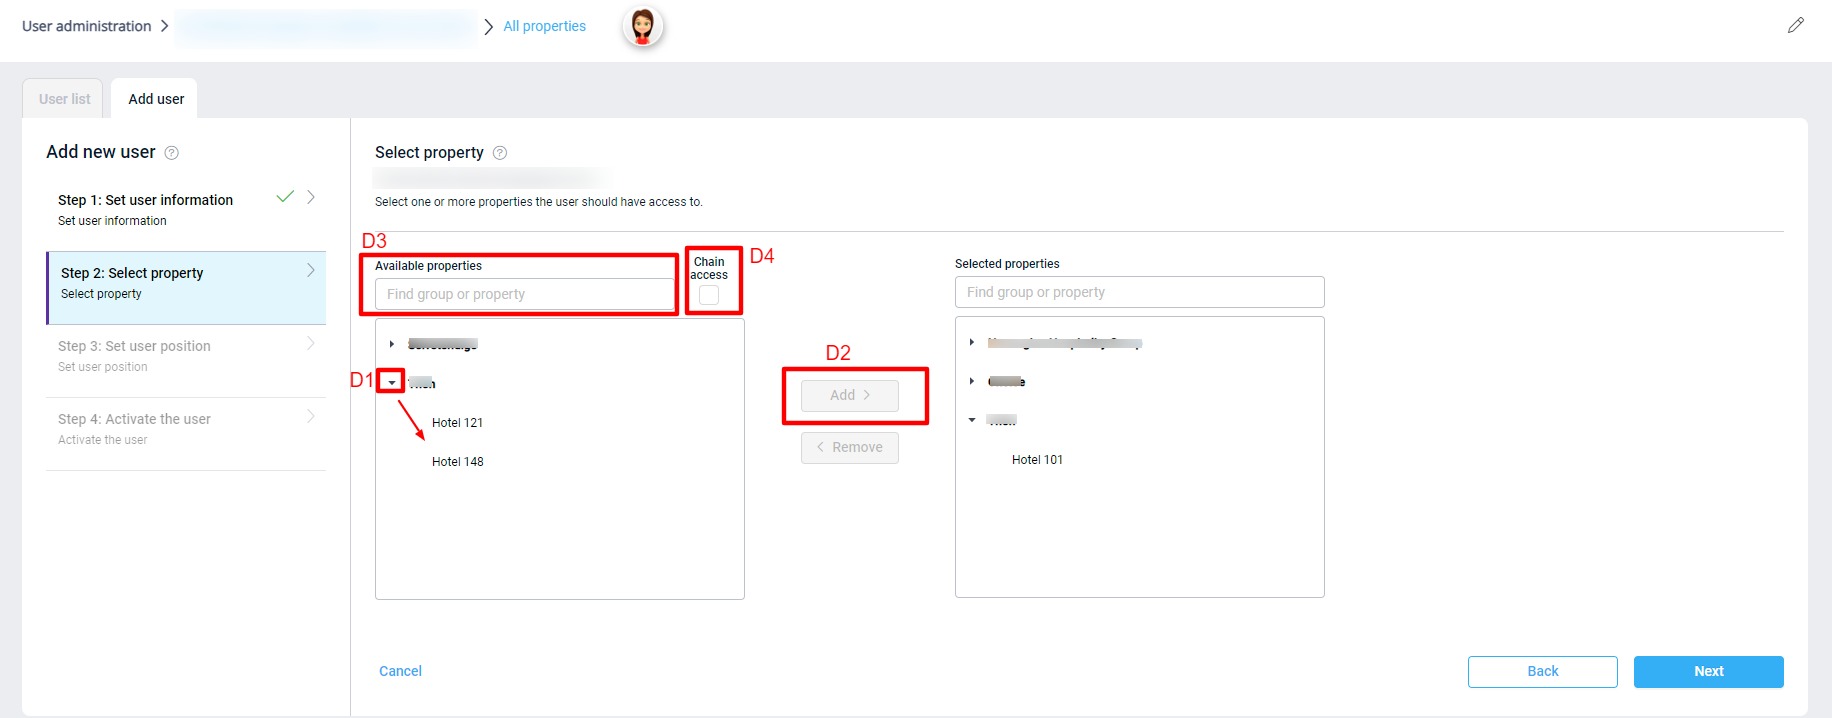
Select the group(s) that the user should have access to and click Add (D2).
To add specific properties, find the relevant group, and select the expand button beside it (D1) to view the properties. You can then select the individual properties and add them to the user’s access list.
Alternatively, use the search button for a quick way to find the correct properties and add them to the user.
ITo remove access, highlight the property or group, and click Remove.
Select tick box Chain access (D4) to give the user access to all properties within the chain. Once you have made the relevant selections, click Next.
Step 3: Set the user position
This is the same as adding a user with single property access.
Select the role for the new user. See the full list of roles and the access rights here.
This screen will display a confirmation of the new user details with the selected roles.
Click on the eye icon to the right of a row to view a breakdown of the access that the new user will have to each module in PMI (C1).
Click on the arrow beside the module (C2) to expand for more details view or edit access in that module.
In general, ‘View’ access allows users to see the module, but they cannot make changes. A user with ‘Edit’ access can make changes but has restricted access to settings. An ‘Admin’ user has full access to make edits and adjust settings in the module.
To edit the selected access, click the pencil icon to the right of the row (C3) to edit or change the role selected. You can also add additional roles (C4) and remove add-on roles (C5). If you change the main user role, some additional roles may disappear. This is because the access rights are already included in the main role. Once everything looks good, click Next.
Step 4: Save and activate the user
Confirm that all the details, including the recipient’s email address, are correct, then click Save and activate the user. Select whether to send an activation email to the user. You can also select to bcc the user administrator in the email, so the administrator can verify whether the email arrived.
If you selected a future valid from date, the email will be sent at the future date. The user will show in the user list with a warning message notifying they are not yet an active user.
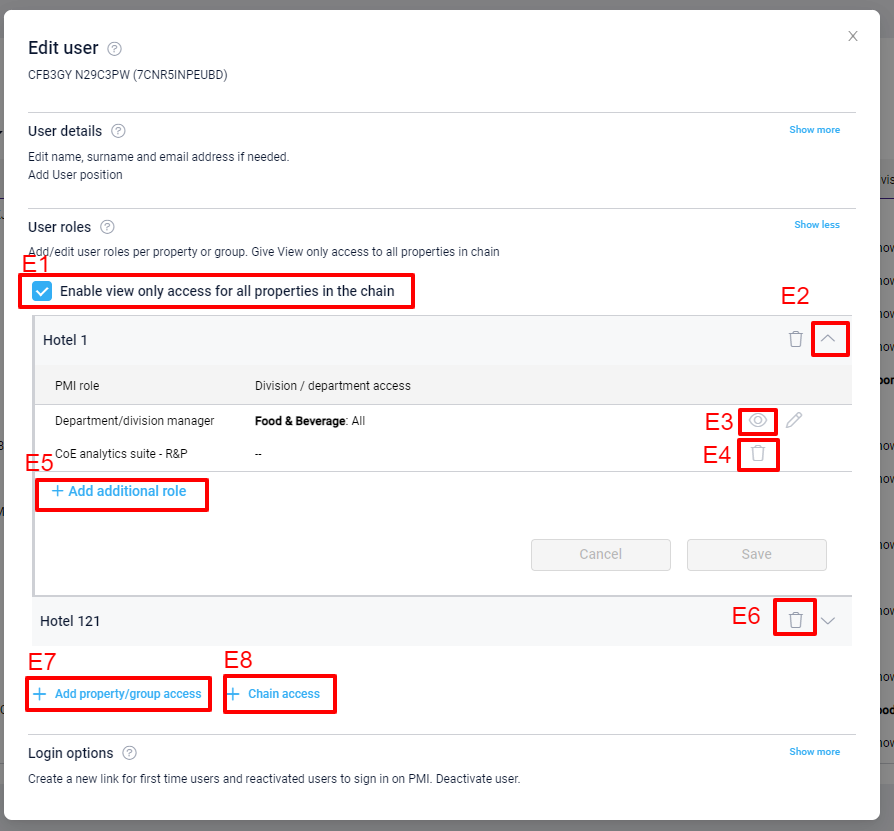
Edit user
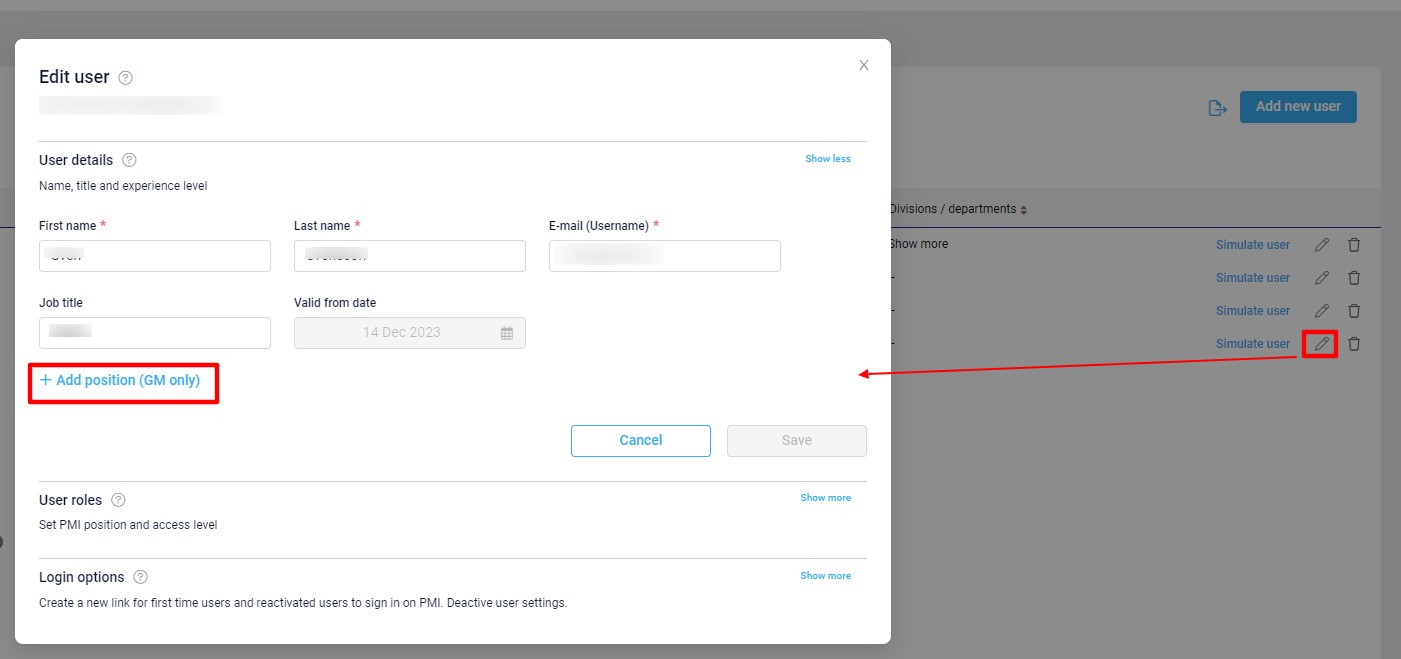
To edit an existing user, click on the pencil icon at the end of the row in the user list.
1. User details
Here, the user details can be edited. You can also assign the user as a General Manager. This will assign this user as owner of the GM daily digest module. The date can be set to take effect at a future or past date. When finished, click Save.
2. User roles
To allow the user to view all properties in a chain, check the box Enable view only access for all properties in the chain (E1). This will not affect any existing access to specific properties.
To view the user’s access, select the arrow by the property name (E2). Clicking on the eye icon (E3) will show the modules that the user currently has access to. Use the pencil icon (E4) to change the main role. You can also delete or add additional roles. (E5) See here for a complete list of user roles available.
Delete access to a property or group by selecting the delete icon by the property names (E6).
Give the user access to additional properties or groups by selecting the button (E7) and following the steps. This will add additional property(s) but will not affect access to existing properties for the user.
To upgrade the user to chain access, select E8. This will remove any property level access and replace with chain access.
3. Login options
Check the box ‘Send email password activation link’ to resend the log-in link for users to create a password and activate their account. An email will be sent directly to the user’s email address. This can be done if the link expired, or if the user did not receive the link when they were added. You can also add an additional email address to send the link to.
Select ‘Deactivate user’ to remove all PMI access from the user. The selected user will not be able to log in once it is deactivated. To reactivate the user, deselect this option. The user will be able to reacess PMI with their old log-in information.
Users who have not logged in to PMI for 60 days will automatically be deactivated from PMI and a message will appear when trying to log in, stating that the user can use the Forgot Password link to activate the account again.
If a user has not logged into PMI for 120 days, the user’s account will be disabled, and the user will need to contact support@d2o.com to create a new password.
Note on password creation
The PMI system supports and enforces password complexity requirements in line with the specified company standards. This includes:
- Minimum Length: Passwords must be at least 8 characters long.
- Upper Case Letter: Passwords must contain at least one uppercase letter.
- Lower Case Letter: Passwords must contain at least one lowercase letter.
- Number: Passwords must contain at least one numeric character.
- Special Character: Passwords must contain at least one special character.

