
Use Planning assumptions to create, manage, and update the values used in your budget and forecast calculations.
This article explains how to navigate the Planning assumptions screen, create and manage assumptions and assumption groups, enter and update values, and use features such as historical suggestions, Fast-fill, and percentage validation.
Before you start: Your available options depend on your user permissions. If an option is not available, you may not have the required access.
See [Planning assumptions overview] for more information regarding user access.
Open Planning assumptions
Planning assumptions is available from the Constants tool in P&L.
- Open Profit & Loss.
- Open Tools.
- Select Constants.
- Turn on the Use new PMI view toggle.
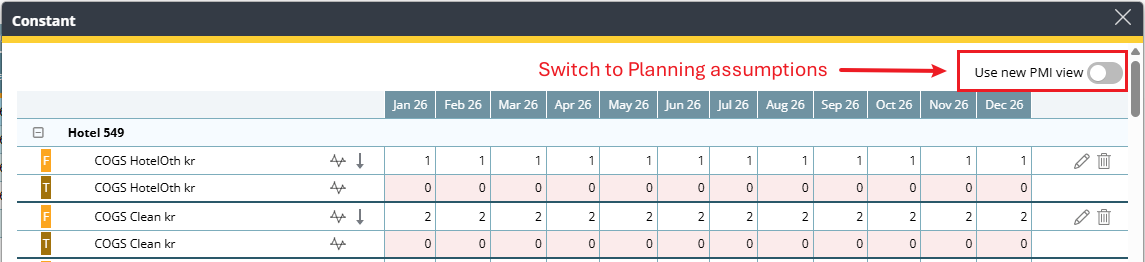
Planning assumptions opens with the property, department, and period you were previously viewing.
PMI remembers your selection, so the next time you open the tool, it opens in the view you last used. To return to the legacy Constants screen, turn Use new PMI view off.
Understand the Planning assumptions screen
The Planning assumptions screen has several areas that help you find and manage your assumptions.
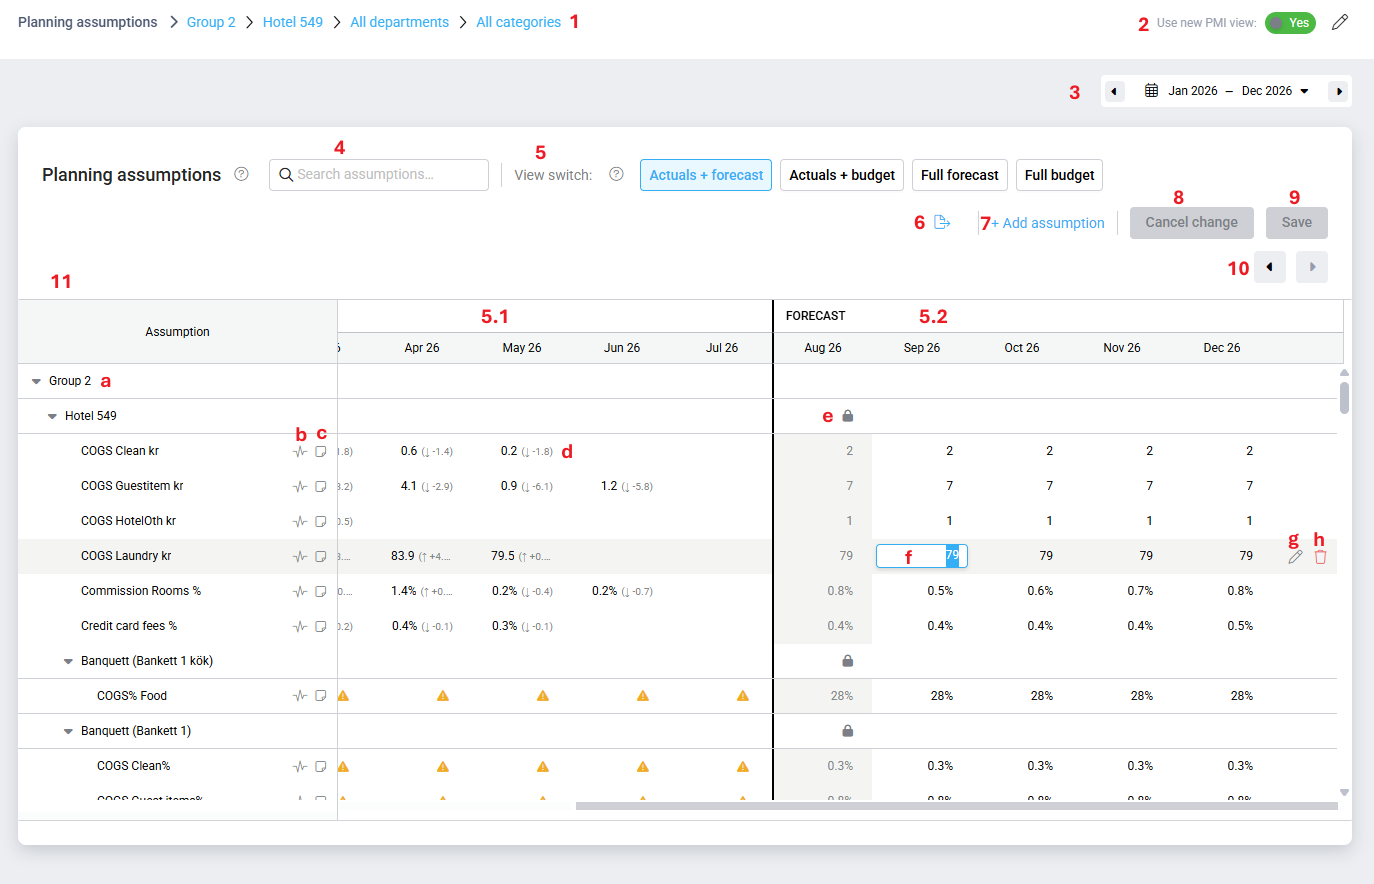
1. Breadcrumb
The breadcrumb shows where you are in the hierarchy:
Group → Property → Department → Category
Use it to filter the assumptions shown in the grid. Click the relevant breadcrumb, such as Group, Property, Department, or Category and the grid updates immediately. Selecting All removes the filter.
Your selected breadcrumb filter is remembered when you next open the screen.
2. Use new PMI view
The Use new PMI view switch lets you move between Planning assumptions and the legacy Constant screen.
Both views use the same planning data.
3. Planning period
The period selector determines which months are displayed in the grid.
The default is the current calendar year. Use the arrows to move a year backward or forward. You can select a period of up to 24 months.
4. Search assumptions
Use Search assumptions to find an assumption by name.
5. View switch
The View switch controls which values the grid displays and saves.
You can choose:
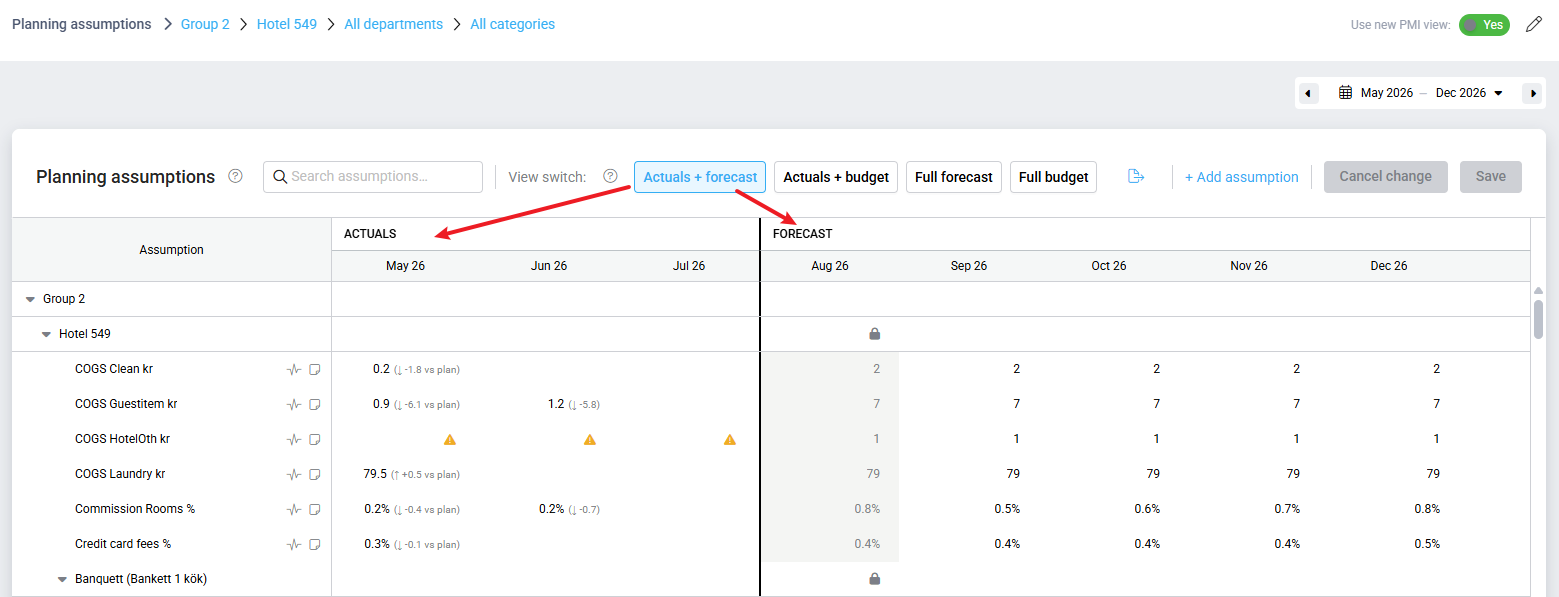
- Actuals + forecast – Actual results for past months and forecast values for future months.
- Actuals + budget – Actual results for past months and budget values for future months.
- Full forecast – Shows stored forecast values for all months.
- Full budget – Shows stored budget values for all months.
The budget views are available only when budget-split is enabled for your company.
Your selected view is remembered when you next open the screen.
6. Export
Use the Export icon to export Plan vs actual data.
The Plan vs Actual export provides both summary and monthly detail and follows the filters currently applied to the grid. The export is covered later in this article.

7. Add assumption
Select + Add assumption to create a new standalone assumption, an assumption group, or an assumption based on an existing one.
The options available in the Add assumption panel depend on your permissions. For more information see Planning assumptions overview.
8. Cancel change
Select Cancel change to discard unsaved changes made directly in the grid.
9. Save
Select Save to save changes made directly in the grid.
The Save and Cancel change buttons become active when you have unsaved changes.
10. Period navigation
Use the arrows to move left or right between planning periods that do not fit in the available space.
11. The grid
The grid contains your assumptions in rows and planning periods in columns.
A dark vertical line separates ACTUALS from FORECAST periods.
The lower-case references in the screenshot identify elements within the grid.
a. Hierarchy Shows the assumption’s position within the property hierarchy. Use the hierarchy to understand where the assumption belongs and how it is organized in the grid.
The hierarchy is displayed as:
Group → Property → Department → Assumption group → Individual assumption
b. Fast-fill Select the Fast-fill icon to quickly populate planning values across multiple forecast months. For more information see How to use Fast-fill.
c. Note A solid blue note icon indicates that a note is available for the assumption. Users with edit action to the assumption can click on the icon to add/change the note.
Hover over the solid blue note will display the text in a tooltip.
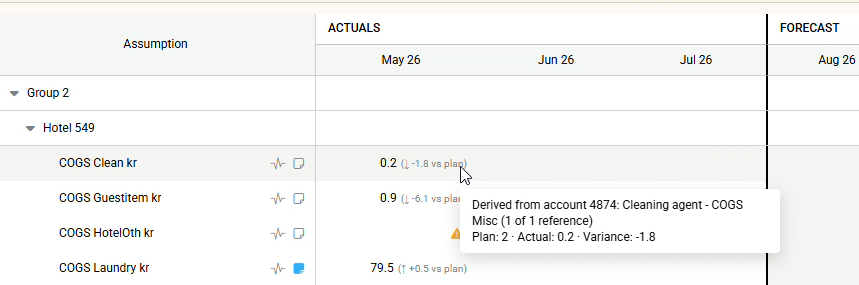
d. Compare actual vs plan (budget/forecast) Shows the actual result compared with your selected plan (budget or forecast). The arrow indicates whether the actual is higher or lower than the plan. Hover over the comparison to see the plan, actual, and variance details.
e. Locked period The lock icon indicates that the period cannot be edited due to a locked period.
f. Edited assumption cell Values in an open future month can be edited directly if a user has edit rights to that assumption. Values can be amounts or percentages.
A blue outline and light blue background shows that a value has been changed but not yet saved.
g. Edit Click on the pencil icon to open the ‘Edit assumption’ panel. Visible when hovering over the line, and only for users with edit access on that level.
h. Delete Deletes the assumption when deletion is allowed. Visible when hovering over the line, and only for users with edit access to that level.
Create a planning assumption
Create a standalone assumption when you need to manage a single value that does not belong to an assumption group.
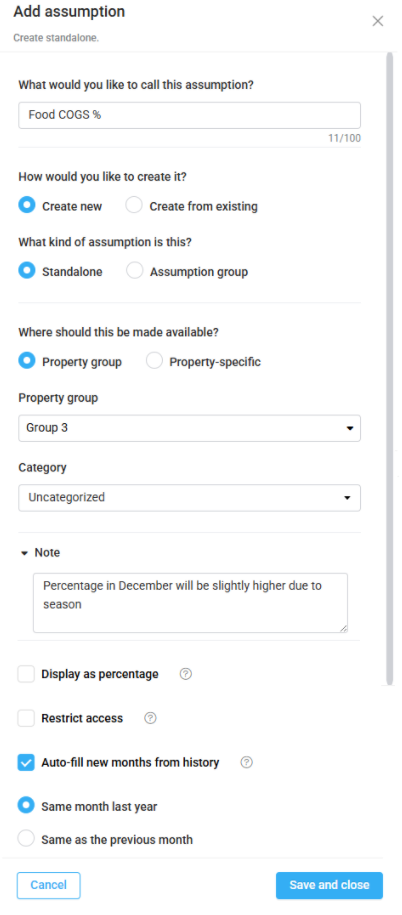
- Select + Add assumption.
- Enter a name for the assumption.
- Under How would you like to create it?, select Create new.
- Under What kind of assumption is this?, select Standalone.
- Choose where the assumption should be available (Group or Property-specific).
- Optionally select a category.
- Add a note, if required.
- Select Display as percentage if the assumption should be displayed as a percentage.
- If you have the required permission, you can select Restrict access.
- For standalone assumptions, you can choose to automatically fill a newly available planning month using the assumption’s own history.
- Select Auto-fill new months from history, then choose Same month last year or Same as the previous month.
For more information read the section: Important to know about Auto-fill
- Select Save and close.
Choose where the assumption is available (Property-specific)
Depending on your permissions and the type of assumption, you can select the appropriate scope.
For property-specific assumptions, the available hierarchy includes:
- Property
- Division
- Department
A specific division can be used to create the assumption across the departments within that division. The available divisions and departments are limited by your existing hierarchy permissions.
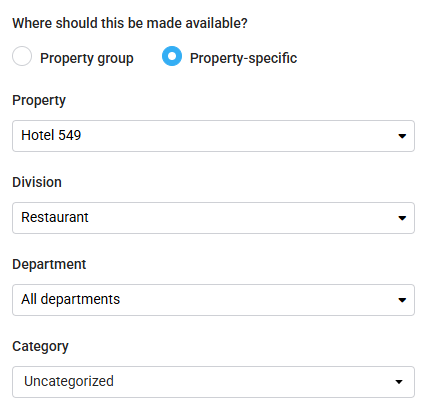
If you select a specific division with All departments, PMI creates one assumption that is available across all departments in that division. The assumption is not created separately for each department.
Important about Auto-fill
Auto-fill is an option that allows Planning assumptions to automatically calculate values for newly available months as the planning window moves forward.
The Planning assumptions grid provides the next 12 months as the normal planning horizon. These months are initially empty and can be populated manually or by using Fast-fill. Auto-fill is used for the next month beyond this horizon. When that month becomes the newest month in the planning horizon, Auto-fill can create its value when the Planning assumptions grid is opened.
If the property has Express planner activated, assumptions at Hotel level use the same Auto-fill setup as Express planner. The last month of the Express planner horizon is the month where Auto-fill is activated. As the planning horizon moves forward, Auto-fill continues to fill each newly available month.
How Auto-fill works
- Auto-fill runs when the Planning Assumptions grid is opened. You do not need to open an individual assumption.
- Only a user with edit (write) access can trigger Auto-fill. Opening the grid with view-only access does not create values.
- When a new latest month is available and is still empty, PMI fills it using the selected option: Same month last year or Same as the previous month.
- Auto-fill applies to both Budget and Forecast.
- It fills only the newest available month. It does not back-fill older empty months.
- Auto-fill is only available on standalone assumptions.
Important: If your date selector already includes the new month, or the last month of the Express Planner horizon, that month has already been viewed in the grid. Auto-fill will not be applied to that month later.
An auto-filled value is marked with the Auto-fill icon. Once you edit the value and save it, the icon disappears and the value becomes a normal saved value. Auto-fill will not overwrite it.
Opening P&L does not trigger Auto-fill. P&L only reads the saved Planning assumption values. Auto-fill runs when the Planning assumptions grid is opened by a user with edit access.
In short: The normal planning horizon gives you 12 months to work with. Auto-fill prepares the next month as it enters the horizon, using the history option you selected. It only works when that month has not previously been viewed in the Planning assumptions grid.
Create an assumption group
Use an assumption group when you have several related assumptions that should add up to 100%. The group makes it easier to manage the child assumptions together and check that their percentages remain balanced.
A group can also be linked to actual data. Each child assumption can be linked to one or more specific accounts. PMI uses this setup to display actuals for the child assumptions, which you can compare with your budget or forecast and use to help determine future values.
Important: When you later set up the related P&L formulas, make sure you use the same accounts that you selected for the child assumptions. This keeps the assumption and the P&L calculation aligned.
Step 1: Create the group
- Select + Add assumption.
- Enter a name for the group.
- Under How would you like to create it?, select Create new.
- Under What kind of assumption is this?, select Assumption Group.
- Choose where the group should be available (Group or Property-specific).
- Optionally select a category.
- Add a note, if required.
- Select Display as percentage
- If you have the required permission, you can select Restrict access.
- Select Next.
Step 2: Set up the group
Under Choose how to set your percentages, select how the initial percentages should be calculated:
- Last avail. actuals – uses the most recent available actual data.
- Last year – uses actual data from the previous calendar year.
- 2 years ago – uses actual data from two years ago.
- 3 years ago – uses actual data from three years ago.
- Even per month – gives each child assumption an equal share.
For the historical options, select the relevant department and account(s) for each child assumption. These selections determine which actual data PMI uses for the child assumption.
- Select + Add child assumption to add the assumptions that belong to the group.
- Fill in the assumption name
- Choose the department and account that should provide the actual data for the assumption.
- Each child assumption can be linked to one or more accounts.
- Remove a child assumption using its delete icon, if needed.
- Review the Ratio mix chart to check how the child assumptions add up to 100%.
- Use Prev and Next to review different months.
- Select Save and close.
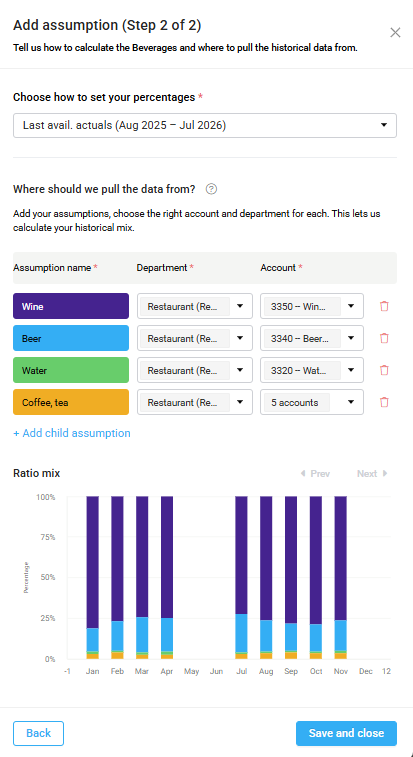
Linking up the historical data
Note! Assumption groups should always have a minimum of 2 assumptions.
How historical actuals are linked to the group
The departments and accounts selected for the child assumptions define which actual data is used to calculate and display the historical values.
These historical actuals remain linked to the current definition of the group. If you later add or remove accounts or departments, PMI recalculates the historical actuals based on the updated definition.
Previously entered budget and forecast values are not changed. Changing the group definition only affects the historical actuals; it does not recalculate or overwrite values you have already entered for future periods.
For more information on how the percentage is calculated from those actuals, see How PMI calculates Planning assumption values
Planning period
The group is populated only for the months currently included in the planning period selected in the date selector.
Future months outside this period remain empty and must be updated manually or by using Fast-fill. Groups do not use Auto-fill, so you only need to add values to future months when they are needed for forecasting in P&L.
Create an assumption/group from an existing assumption/group
You can create a new assumption by copying an existing standalone assumption or group and using it as the starting point.
- Select + Add assumption.
- Select Create from existing.
- Under Assumption to copy from, select whether you want to copy a Standalone assumption or a Group.
- Find and select the assumption or group you want to copy.
- Make any required changes to the new assumption, including whether it should be displayed as a percentage.
- Select Save and close.
For a copied group, Next opens Step 2 with the child assumptions and distribution method already populated.
PMI automatically makes the copied name unique, for example Management fee (copy) or Management fee (copy 2).
The copied assumption or group is a new item. Its values are copied from the original, but its formula links are not.
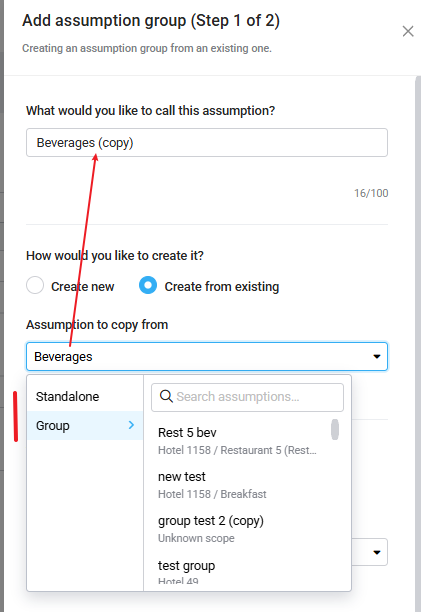
Create a group from existing group
Enter and update values
You can enter values directly into editable cells in the grid.
- Select a forecast-month cell.
- Type the value.
- Move to another cell or press Tab.
- Repeat for any other values you need to change.
- Select Save.
Historical actuals can be used to give you a starting point for planning values when creating an assumption group. PMI uses the selected historical data to suggest the percentage for each child assumption. Review the suggested values and adjust them as needed before saving.
For information about populating multiple months at once, see How to use Fast-fill.
Unsaved changes are shown with a blue outline and light blue fill.
To discard all unsaved grid changes, select Cancel change.
For percentage assumptions, enter the percentage as a number. For example, enter 14.5 to display 14.5%.
Closed months, locked periods, group and department rows, and account-detail rows cannot be edited.
Unsaved and conflicting changes
Your changes are held until you save them.
If a problem occurs while saving, PMI highlights the affected cells so you can correct them.
If someone else changes the same cells before you save, PMI tells you that the values have changed. For a single assumption, you must Refresh to load the latest version.
For a group, you can choose to:
- Reload Latest Data – Discard your edits and load the latest version.
- Force Save – Save your changes and overwrite the other user’s changes.
- Cancel – Close the message and keep your edits on screen.
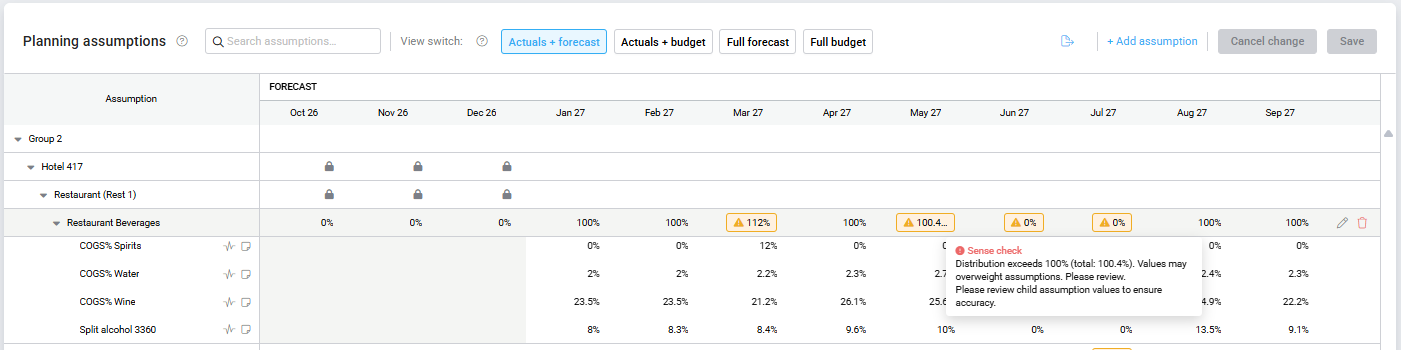
Keep percentage groups at 100%
For a percentage-based assumption group, the child assumptions must total 100% for each month.
The group header row shows the total for each month.
If the total is below 100%, PMI warns you and Save is blocked until the distribution reaches 100%.
If the total is above 100%, PMI shows a warning, but saving is not blocked.
If a total is not 100% when you save:
- The affected header cell is highlighted.
- A Sense check message shows the current total.
- Adjust the percentages.
- Save again.
The warning disappears when the total reaches 100%.
The 100% check applies only to groups where all children are percentage assumptions.
Edit a planning assumption or group
Use Edit to change an existing assumption or group.
- Hover over the row.
- Select the pencil icon.
- Change the information you need.
- Select Save and close.
For standalone assumptions, some settings are fixed after creation, including the creation method, assumption type, and scope.
For groups, edit the parent group to change the setup that controls its child assumptions, such as the Department and, where applicable, the Division, distribution method, and child assumptions. You can also make limited changes directly on a child assumption, such as Notes and Display as percentage.
Changing certain group settings can trigger a confirmation message. For example, changing the distribution method to Even per month removes the department and account selections.
If you change a child’s Department or Account, PMI asks you to confirm that the actuals display should be updated. Your stored planning values are not changed.
Some settings cannot be changed after the assumption is created, including the creation method, assumption type, scope, and property group.
If an assumption is already used in a P&L formula, Display as percentage cannot be changed.
Add or edit a note
Use a note to record useful information about an assumption, such as what the value represents or why it was created.
- Select the note icon on a standalone assumption or assumption group.
- Enter a note of up to 300 characters.
- Select Save and close.
A solid blue note icon indicates that a note exists. Hover over the icon to preview the note.
Child assumptions within a group do not have separate notes; the note belongs to the group.
Delete an assumption or group
Deleting an assumption permanently removes the assumption and its stored values. There is no undo.
- Hover over the row.
- Select the Delete icon.
- Review the confirmation message.
- Select Delete.
Deleting a group also deletes its children.
PMI will not allow to delete the last two child assumptions of a group.
If deleting a child would leave a percentage group below 100%, PMI warns you before the deletion.
If the assumption is used in a P&L formula
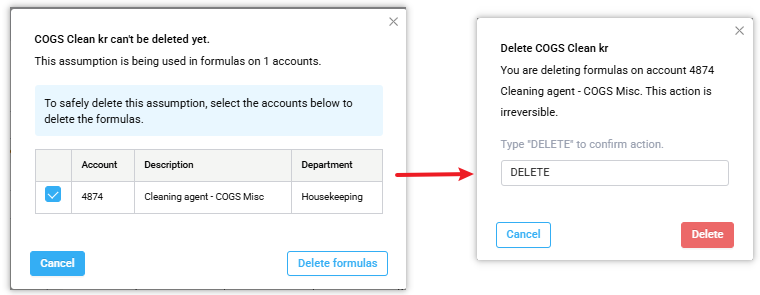
An assumption used in account formulas cannot be deleted until its formula references have been dealt with.
PMI shows the accounts using the assumption.
- Select the accounts whose formulas you want to remove.
- Select Delete formulas.
- Type DELETE to confirm.
- Delete the assumption separately once the formula references have been removed.
Important: Deleting formulas permanently removes those P&L formulas. Make sure you understand the impact before confirming the deletion.
Manage restricted assumptions
Restricted assumptions are used for sensitive planning values.
A restricted assumption is identified by a Restricted badge.
Only users with HQ Administrator role can add and view restricted assumptions. HQ Administrator role cannot edit any restricted assumptions. If you want to edit a restricted assumption, please contact support@d2o.com.
Locked periods
When a planning period is locked, the cells are greyed out and show a lock icon. Locked cells cannot be edited.
Hover over the cell to see the lock information. Contact your administrator if a locked period needs to be opened.
See who last changed a value
You can see the history of a value by hovering over its cell. This applies to future values
The tooltip can show who changed the value, when it was changed, ow it was changed, such as manual entry or Fast-fill and whether it was migrated from the legacy Constants tool
A cell that has never been changed shows No value entered.
Export Plan vs Actual data
Use the Plan vs Actual export when you need more detailed analysis outside the Planning assumptions grid.
For a large export, PMI shows an Export ready notification with a Download button.
The export contains two tabs:
- Summary – Summary information by assumption and account.
- Monthly detail – One row for each assumption, account, and month.
The Monthly detail includes plan, actual/implied actual, difference, difference percentage, GL actual, driver, and period type.
The export follows the filters currently applied to the Planning assumptions grid. Actual and difference values are provided for actual-period months; forecast months contain plan values.
Switch back to the legacy Constants view
Planning assumptions and Constants use the same underlying planning data.
To switch back to the legacy Constants screen:
- Turn Use new PMI view off.
- The legacy Constants screen opens.
To return to Planning assumptions, turn Use new PMI view on again.
Your planning data is retained when you switch between the two views.